Q. What do I do with Dahlia Bulbs?
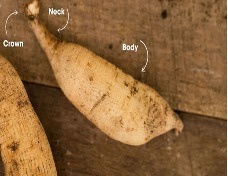
Dahlias grow from tubers, not bulbs. These are modified stems that store the nutrients that the plant needs such as starches. They also store the energy that a plant needs to allow new growth after dormancy. The top sides of the tuber produce shoots that grow into stems and leaves and the undersides produce roots.
Care of tubers starts with proper treatment during the growing season. After sprouting, Dahlias benefit from a low-nitrogen, liquid fertilizer, such as 5-10-10 or 10-20-20. Fertilize every 3 to 4 weeks from sprouting in midsummer until early autumn and water the plants thoroughly in hot weather. For more blooms, deadhead as flowers fade.
While most dahlias start producing tubers in the spring, the roots do not mature until late in the growing season.
Before digging up the tubers, dig up and discard any plants that were weak during the growing season or that produced inferior blooms or no blooms at all. If any plants had signs of virus that could affect plant or bloom performance, bag them and send them to the local landfill or incinerator rather than placing them on a compost pile. Before frost, be certain to have correct cultivar names attached to each stake to allow for identification of colour, etc. for the next season.
The longer the tubers are in the ground curing, the more fully developed the tubers and the better the likelihood of them keeping well over the winter. While you can start digging before frost or before the rainy season along the Pacific Coast, gardeners should seriously consider letting their dahlia roots continue to grow and mature as long as practical. Most areas have a light frost that ruins partially opened blooms and top foliage followed by a hard freeze that may be a few weeks later. Dahlias continue to grow and the roots continue to mature after light frosts, and they may even continue to grow after the first killing freeze (depending on how deep the freeze affects the soil.)
Cutting stems: Ideally, cut the stems a few days before digging, to allow them to dry down a little. However, if water gets into the stem, it can promote crown rot and ruin the tubers so be aware of the weather forecast for those days. To avoid spreading viruses from one plant to another, dip cutting tools in a solution of one part bleach to ten parts of water before switching between one plant and the next. Leave enough stem (at least a few inches) to facilitate handling the clumps easily.
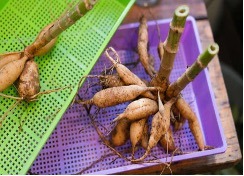
Dig and handle the clumps with care. A dahlia tuber’s neck is fragile, especially right after digging. To remove the clumps, dig on all four sides of the plant, about a foot away from the main stalk. When all four sides are loose from longer feeder roots, push the shovel or tined fork under the clump and lift carefully. Gently remove any large clumps of dirt and turn the clump upside down to drain out any water in the stem. If you dig in the morning and leave the clumps out in the air for a couple of hours, the tubers will be much less fragile but still need gentle handling. Rinse off any remaining dirt with a gentle flow from a hose.
To divide clumps, each division must have a piece of the crown with an eye. Remove all of the stem and any feeder roots because they can promote crown rot and ruin the tuber. Tubers need only be large enough to keep well through the winter without shriveling. After cutting divisions, use a hose or indoor laundry tub (in cold weather) to wash the tubers again and remove any dirt
missed when first washing the clump. After rewashing, cut the end of the tuber. Any brown or rusty coloured area indicates rot. If any of these signs are present, cut away toward the crown to see whether the tuber has a clear section that includes the crown. If so, the tuber should be viable. If not, throw it away. Treat the cut ends with a fungicide. Your local plant nursery or garden centre will be able to recommend a fungicide suitable for Dahlias. Dahlia tubers can be stored in Styrofoam, wooden or cardboard containers with each layer separated by a layer of vermiculite or several sheets of newspaper. Tubers should not touch each other. Keep a lid on the container to prevent too much moisture escaping, causing the tubers to shrivel. They can also be stored in labelled paper bags.
Store the tubers at a nearly constant, cool temperature. Most growers recommend a range of 40 to 45 degrees. Freezing temperatures ruin tubers, and higher temperatures encourage microorganisms and fungus. Warm temperatures prompt tubers to develop sprouts and feeder roots too soon.
Inspect tubers monthly during the winter. Throw away any tubers that show signs of rot. By checking frequently, you can throw away infected tubers before the rot spreads to otherwise healthy ones.
In early spring, move the tubers to a warm location (dark but room temperature) to encourage eyes to develop in preparation for planting out.
After all threat of frost has passed (in the Pacific Northwest, a general rule of thumb is the May long weekend) and the soil has warmed up to 14-15 °C (58-60°F), choose a spot in the garden with full sun. Dig a planting hole approximately 6 inches (16cm) deep for each tuber. Mix the dug soil with compost and a handful of bone meal. Fill the hole until it is 15cm (6″) deep. For tall varieties of Dahlias, insert plant support stakes at this time so as not to damage tubers later. Place the tuber with its “eye” pointing up. Cover it with 5cm (2″) of the soil mix. Once the stemhas grown to 10cm (4”) above the surface, add more soil, and repeat until the dug soil is used up and once the stem is 30cm (12″) tall, pinch its growing tip to encourage bushier growth. Pinch
the centre shoot just above the third set of leaves to encourage bushiness. The dahlias can also be grown in large pots although some of the very tall varieties may make a pot unstable.
Sources
https://en.wikipedia.org/wiki/Tuber
https://www.dahlia.org/docsinfo/articles/digging-dividing-and-storing-tubers/
https://www.bootstrapfarmer.com/blogs/growing-flowers/easy-guide-to-splitting-dahlia-tubers?srsltid=AfmBOoofSZ2Oneo2iKqbx0D7eWjXqWJBql4e6A5rO26uSMAtvb3OAAvW
(for images only)
Images from my garden.
Q. Why can’t we eat hybrid potatoes grown from seed? I saw a handwritten note ‘do not eat’ on the entry tag for the Fall Fair of a hybrid potato.
The high importance of the potato crop worldwide does not depend only on the fact that it is the third most consumed crop after rice and wheat. The high energy content of the tubers, the simple cultivation technique of the crop, and the extensive geographical range of production areas have made potatoes an important food security crop, especially for developing countries and small farmers. Potatoes are also a much more nutritious source of food than other top crops such as rice, soy and wheat. They contain high levels of vitamins and relatively few calories, yet potatoes can be processed and cooked into many different forms – potentially providing varieties that grow where not much else can grow.
Hybrid potatoes are created by crossing two genetically uniform (inbred) parent lines, not through genetic engineering. Scientists have experimented with hybrid potato breeding over the past few years to simplify and accelerate the creation of new potato varieties, with many promising results. The process comprises making potatoes diploids (having only 2 copies of chromosomes like tomatoes) and self-compatible. This allows the introduction of a new characteristics in only 3-4 years. Potato hybrids are not by any means Genetically Modified Organisms.
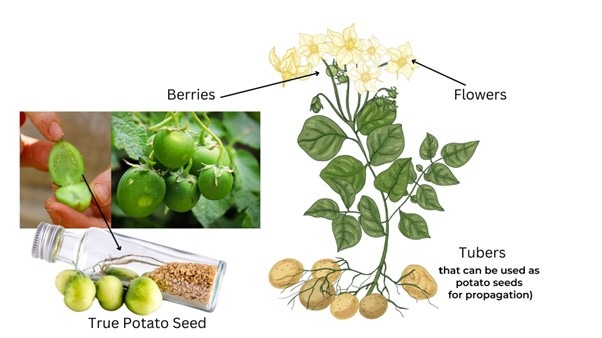
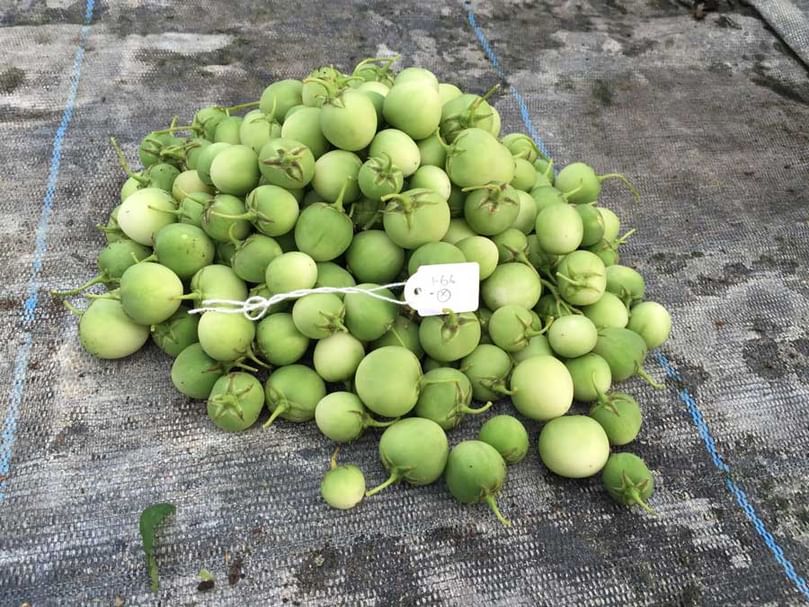
Like many other popular vegetables, hybrid potatoes can reproduce by using both the tubers and the actual botanical seeds (True Potato Seeds) produced sexually. Depending on the potato variety, a plant can produce 5 to 50 berries, each containing 50-150 seeds. These seeds are tiny, even smaller than tomato seeds, and only 25 grams of TPS (62,500 seeds) will be needed instead of 2,500 kilos of potato tubers to plant a one-hectare field. The seeds are pathogen free whereas tubers mostly have a low level of disease-causing pathogens. True potato seeds also withstand changes in temperature and humidity. Ultimately the reduction in transport will also reduce carbon footprint.
Scientists released the first varieties in 2024. The hybrid breeding technology will open the door for creating new, improved potato varieties resistant to potato diseases, higher nitrogen and water use efficiency and superior quality characteristics. This will help farmers cope with the effects of climate change and cultivate more sustainably, reducing the use of phytochemicals.
There are a series of options for switching to True Potato Seed for a crop. These include sowing seed directly in the field, pre-growing in seedling nurseries followed by field-planting, and growing seedlings in the first year to produce distributable potato tubers.
Probably the latter will be the initial system of choice as it does not require the farmer to retool.
Hybrid potatoes are slowly becoming available for planting as the research and development continues and these potatoes are safe to eat. It may be that the grower was indicating that they were not for eating as they were to be used for ongoing seed development and production.
Sources
https://researchoutreach.org/articles/better-stronger-potatoes-using-hybrid-breeding/